Creating a shower pan on a wood floor is a task that requires some planning and preparation. It’s an important part of building a shower, as it provides a waterproof barrier between the floor and the shower walls. This article will provide some tips and ideas on how to build a shower pan on a wood floor.
Preparing the Floor
The first step in building a shower pan on a wood floor is to make sure the floor is properly prepared. The floor should be level and free of any debris or objects that could interfere with the installation. It’s also important to make sure the floor is sealed properly to prevent water from seeping through.
Installing the Base
Once the floor is prepared, the next step is to install the base of the shower pan. This is usually made from a waterproof material such as PVC or rubber. The base should be cut to fit the dimensions of the shower area and then secured in place with screws or adhesive.
Laying the Liner
Once the base is in place, the next step is to lay the liner. This is a waterproof material that will provide an additional layer of protection against water seepage. The liner should be cut to fit the dimensions of the shower area and then secured in place with adhesive.
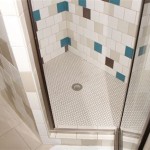
Adding the Tile
The final step in building a shower pan on a wood floor is to add the tile. This is an important step, as it will provide a decorative touch to the shower area. The tile should be cut to fit the dimensions of the shower area and then secured in place with adhesive.
Conclusion
Building a shower pan on a wood floor is a task that requires some planning and preparation. It’s important to make sure the floor is properly prepared, the base is installed properly, the liner is laid correctly, and the tile is added securely. Following these steps will help ensure that the shower pan is properly constructed and will provide a long-lasting, waterproof barrier between the floor and the shower walls.


Related Posts