A Comprehensive Guide to Moen Plastic Shower Handle Replacement
Replacing a worn or damaged Moen plastic shower handle is a relatively simple task that can enhance the functionality and aesthetics of your shower. This guide will provide you with step-by-step instructions and essential tips to ensure a successful replacement.
Materials Required:
- New Moen plastic shower handle
- Adjustable wrench or pliers
- Screwdriver
- Cloth or paper towels
Step 1: Shut Off Water Supply
Before beginning any work, it's crucial to shut off the water supply to the shower. Locate the water supply valves beneath the sink or behind the access panel in the shower area. Turn the valves clockwise to the closed position.
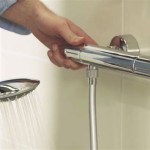
Step 2: Remove Existing Handle
Using an adjustable wrench or pliers, carefully loosen the retaining nut that secures the handle to the valve body. Once loosened, use your hand or a screwdriver to remove the nut completely. The old handle should now freely detach from the valve stem.
Step 3: Remove Cartridge
Beneath the handle, you will find a cartridge that controls the flow of water. Use a screwdriver to unscrew the cartridge retaining nut. Gently pull out the cartridge, taking care not to damage its seals or internal components.
Step 4: Inspect Cartridge
Examine the removed cartridge for any visible damage or debris. If the cartridge is damaged, it should be replaced. If it appears clean and undamaged, you can proceed with the handle replacement.
Step 5: Install New Cartridge (Optional)
If a new cartridge is required, insert it into the valve body and tighten the retaining nut. Ensure that the cartridge is properly seated and does not leak water when the water supply is turned back on.
Step 6: Install New Handle
Align the new shower handle with the valve stem and push it into place. Tighten the retaining nut using your wrench or pliers, being careful not to overtighten it.
Step 7: Turn on Water Supply
Return to the water supply valves and turn them counterclockwise to restore water flow to the shower. Check for any leaks around the handle and tighten the retaining nut further if necessary.
Tips:
- Use a wrench or pliers with rubber or plastic jaws to prevent scratching the finish.
- Apply a small amount of plumber's grease to the cartridge seals to ensure a watertight connection.
- If the handle becomes loose over time, simply retighten the retaining nut.
- Always consult the manufacturer's instructions for specific model variations.
By following these steps and recommendations, you can successfully replace a Moen plastic shower handle and restore your shower to its optimal performance and appearance.

Moen Clear 1 Handle Knob Shower Faucet In The Handles Department At Com

Moen Cau Handle Kit In Clear 98039 The Home Depot

Proplus Part 2031021 Moen Shower Handle In Clear Faucet Handles Levers Controls Home Depot Pro

Moen Cau Posi Temp Shower Knob Handle Kit 94514 The Home Depot

Moen Old Oem Style Clear Replacement Tub Shower Handle 13094

Moen Clear 1 Handle Knob Shower Faucet In The Handles Department At Com

Essential Values Moen 1222 One Handle Replacement Faucets For Shower Cartridge Com

Master Plumber Faucet Handle Moen 96884 Plastic Clear 109ak Réno Dépôt

Diy How To Replace Shower Faucet Trim Plate And Handle Moen

Hot Cold Faucet Handle Shower Diverter Fits Moen Clear Includes Index 1 Set Com
Related Posts