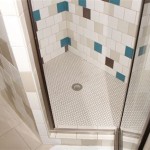
Glass subway tile showers are becoming increasingly popular in modern home design, and for good reason. The clean, timeless look of subway tiles is a great way to add a touch of class and elegance to your bathroom. If you’re looking for a way to upgrade your shower area and create a unique space, installing a glass subway tile shower is a great option.
Benefits of Installing a Glass Subway Tile Shower
There are many benefits to installing a glass subway tile shower in your home. Here are some of the biggest advantages:
- A timeless look: Glass subway tiles will never go out of style. This makes them a great choice for any home, as they will always look modern and classy.
- Easy to clean: Glass subway tile showers are easy to keep clean and require minimal maintenance. The glossy surface is resistant to mold and mildew, making them the perfect choice for a low-maintenance shower area.
- Cost effective: Glass subway tile showers are relatively inexpensive, making them a great choice for homeowners on a budget.
- Durable: Glass subway tile showers are highly durable, meaning they will last for many years with minimal upkeep.
How to Install a Glass Subway Tile Shower
Installing a glass subway tile shower is not a difficult process, but it does require some planning and preparation. Here are the steps you’ll need to take to successfully install a glass subway tile shower:
- Plan the layout: Before you begin the installation process, it’s important to plan the layout of your shower area. Determine the size and shape of the space and decide where you want the tiles to be placed.
- Prepare the walls: Once you have a plan, you can begin to prepare the walls. Remove any existing tiles or other materials and make sure the walls are level, clean, and free of debris.
- Measure and mark: Next, measure and mark the wall where you will be placing the tiles. Be sure to measure carefully to ensure a professional finish.
- Apply the adhesive: Once the walls are prepared, you can begin to apply the adhesive. Use a trowel to spread the adhesive evenly over the wall and let it dry for the recommended time before beginning the tile installation.
- Install the tiles: Now you can begin to install the tiles. Start in the corner and work your way out. Be sure to use spacers to maintain even spacing between the tiles and use a wet saw to cut any tiles that need to be trimmed.
- Grout the tiles: Once all the tiles are installed, it’s time to grout them. Use a grout float to push the grout into the spaces between the tiles and use a damp sponge to wipe away any excess grout.
- Seal the grout: Finally, you’ll need to seal the grout to protect it from moisture. Use a grout sealer and follow the manufacturer’s instructions for best results.
Conclusion
Installing a glass subway tile shower is a great way to upgrade your bathroom and create a timeless, elegant look. With minimal effort and cost, you can create a luxurious shower area that will last for many years. If you’re looking for a way to add a touch of class and sophistication to your home, a glass subway tile shower is a great option.


Related Posts